I got my new surface book and docking station and thought this will boost my 2x27 inch screens. After docking my notebook I got a very blurry experience. After some research I found a solution. The reason are wrong settings you can easily fix. This solution is not limited to surface books. ;-)
Before:
After:
Solution: You need to make the external monitor as "main display". Also you need to sign of and on again while you are connected. After this your screen should be crisp and clear.
With the new release of Windows 10 - 1709 there is a great new feature out called "Windows Defender - Application Guard"
The idea is to limit the access to the system by isolating the browser experience and lock in hackers potentially using the browser to enter the system.
This feature let your Edge browser run in a VM for unknown websites. You will not experience a VM startup. It just feels like a "different private mode" in your browser.
A good idea - how it works behind the scenes - can be found in this video:
End-users know the difference by a visual representation.
You can manage it through GPOs telling which trusted websites (e.g. organizational websites) should be open in Edge normally also using the full set of Win32 APIs.
All other websites would be opened in the sandboxed version of Edge. The sandboxing is realized also by Hyper-V virtualization. It includes a kernel with a limited set of Win32 APIs to make it even harder to break in. But even if it is possible to break in the attacker is locked in the virtualization layer. When you close the browser the threat is also gone. As this is a non persistent environment.
Additionally this is tied into Windows Defender Advanced Threat Protection. So you get even notified if someone tried to compromise your environment.
And to get the FULL CURRENT (1709) holistic Microsoft Security view. Please checkout this recent video. Which covers more than just Application Guard which is one brick in a bigger wall.
To enable it is relatively simple (depending HW reqs.)
But you need to fulfill the requirements:
Windows 10 Enterprise SKU only
PC must support Hyper-V (some older PCs may not support Hyper-V or have this feature disabled in BIOS)
Windows Defender Application Guard is Off by default, it must be enabled manually or by policy
When you follow these limits and you enable GuestVirtualization in the Hyper-V (only possible via Powershell) then it works also in a VM.
Otherwise the feature is greyed out!
Currently WDAG reacts a bit tricky with Updates. So it worked in 16299.19 in English-US version of Windows. Update KB4043961 broke the feature so you need to dismiss this update. Also other languages may not work right away. But in later version onwards 17035 is also starts to working in German again.
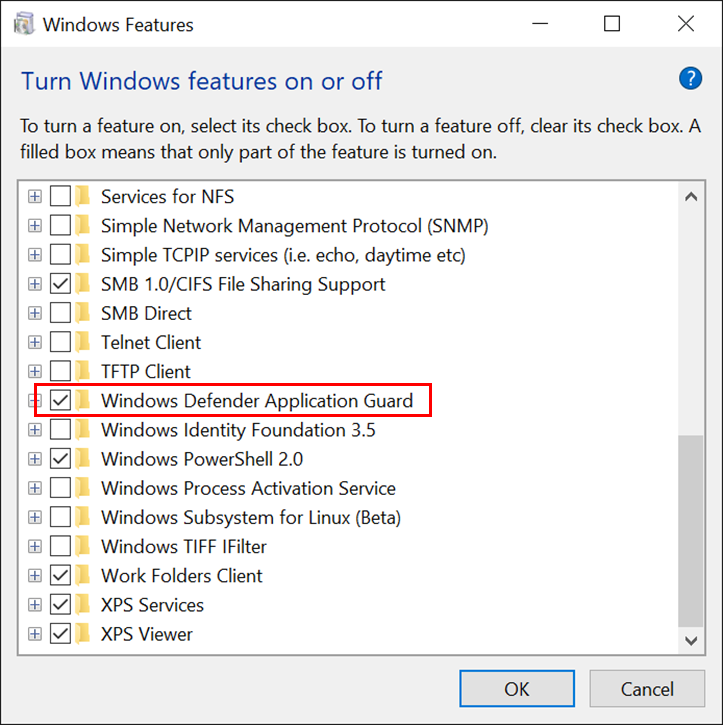
1. You need to enable Windows Application Guard in the "Windows Features"
2. You need to setup the Policies for WDAG (very important!)
One of my customer recently asked me how to preset the default backgrounds to more corporate like backgrounds. After some investigation I found how to change this. Checkout here the Reg Key and Folders: The first of the five pictures is the CURRENT background which is stored in another folder as the HISTORICAL ones.
You need to modify the pictures in these folders: C:\Windows\Web\Wallpaper\Windows -> This is the current img0.jpg (the blue Windows logo) C:\Windows\Web\Wallpaper\Theme1 -> here you find the history of last used pictures. This will change during usage. The responsible Registry key is: HKEY_CURRENT_USER\Software\Microsoft\Windows\CurrentVersion\Explorer\Wallpapers Keep in mind that this CURRENT USER registry key need to be either modified due to the default profile. But I would recommend to keep the registry key as it is and simply replace the corresponding files img0.jpg in the Wallpaper\Windows folder and the files img1.jpg, img2.jpg, img3.jpg img4.jpg in Wallpaper\Theme1 folder. Please keep in mind the Theme1 folder is hidden!
Recently a customer asked me how to add a browser window to the lockscreen before login so they can add their "old" Password selfservice solution add again to the user experience. Microsoft added the Password self service solution to Azure AD Premium also for local clients without the need for a website. You can reset your password directly on the logon screen. By clicking on "Problems Logging In?"
Sorry the picture shows it on Windows 8 but for Windows 10 I did not find a picture. Microsoft either. But it looks nearly the same in the UI experience. To verify your self you will receive a phone call on a pre registered phone. It may also include additional security questions when you add them during the verification process.
You need therefore either Microsoft Identity Manager (MIM) or Azure Active Directory Premium which includes the onpremise license for the full MIM for server and client. Thats why I state "nearby" builtin. You need a "little extra MS". If you have Enterprise Mobility & Security then you have it already :-) Here you find more info and screenshots about it. https://docs.microsoft.com/en-us/microsoft-identity-manager/working-with-self-service-password-reset
Recently Microsoft released an interesting article about failing WSUS to deliver updates to Windows Clients. Currently affected are Versions before 1703 but due to the nature of the updates and the issue this will be soon the case also for the current Version.
Short Story: High CPU and Memory consumption on the WSUS process (w3wp.exe IIS worker threat) due to the high volume of meta data caused by later and therefore larger cummulative updates for Windows 10. The symptoms include:
High CPU on your WSUS server – 70-100% CPU in w3wp.exe hosting WsusPool
High memory in the w3wp.exe process hosting the WsusPool – customers have reported memory usage approach 24GB
Constant recycling of the W3wp.exe hosting the WsusPool (identifiable by the PID changing)
Clients failing to scan with 8024401c (timeout) errors in the WindowsUpdate.log
Mostly 500 errors for the /ClientWebService/Client.asmx requests in the IIS logs